
Forwarding data to Azure IoT Hub
Step-by-step guide to connecting the DataTalk gateway to Microsoft Azure IoT Hub and streaming live tag values as device telemetry.
On this page
This guide walks through connecting the DataTalk gateway to Microsoft Azure IoT Hub so that tag values are automatically forwarded as IoT device telemetry. Once configured, data flows from your field devices through DataTalk into Azure — where it can be routed to Stream Analytics, Event Hub, Blob Storage, or any other Azure service.
What you need
- An Azure account with an active IoT Hub (free or standard tier both work)
- A registered IoT device in that hub — copy its Primary Connection String
- The DataTalk gateway configured with at least one Connection and tags reading correctly
Step 1 — Register the gateway as an IoT device in Azure
Go to portal.azure.com, navigate to your IoT Hub resource, and open Devices from the left menu.
Click Add Device. Give it a descriptive name — for example datatalk-gateway-plant1. Leave authentication type as Symmetric key and click Save.
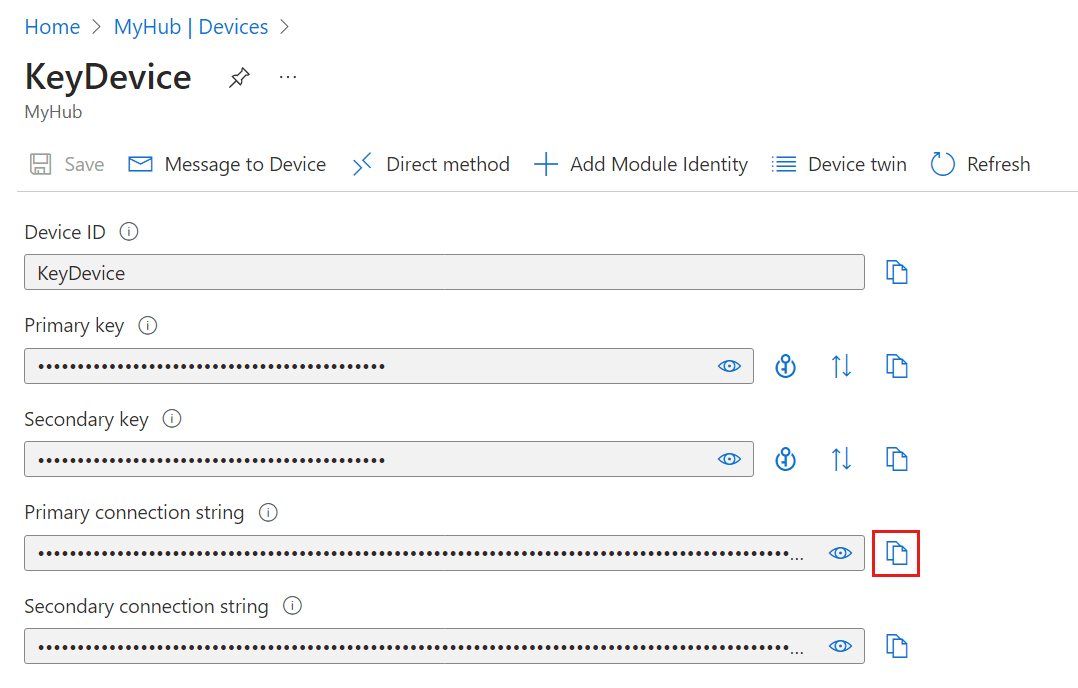
Click the newly created device name to open its detail. Copy the Primary connection string — it looks like:
HostName=myhub.azure-devices.net;DeviceId=datatalk-gateway-plant1;SharedAccessKey=abc123...You will paste this into DataTalk in the next step.
Step 2 — Configure the Gateway in DataTalk
In the DataTalk project tree, expand Data Interface → Gateway and double-click Gateway to open the configuration panel.
In the Type dropdown at the top, select Azure IoT Hub. The connection fields update immediately.
Paste the Primary Connection String copied from the Azure portal into the Device Connection String field.
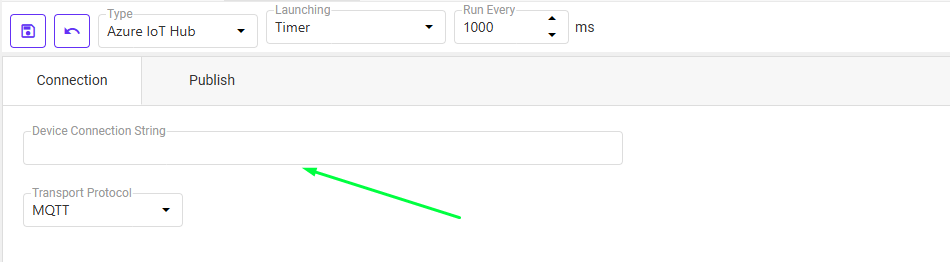
Leave Transport Protocol as MQTT unless your network blocks MQTT port 8883 — in that case switch to AMQP.
Set Launching to Timer and Run Every to how often you want data sent (in milliseconds). For one-second telemetry use 1000; for one-minute use 60000.
Click the Publish tab and select which tags to include in each message. By default all tags are forwarded; filter here if only a subset should go to Azure.
Click the Save button (floppy disk icon, top left). The gateway immediately begins sending telemetry to Azure IoT Hub.
Step 3 — Verify data is arriving in Azure
In the Azure portal, open your IoT Hub → Overview → check the Messages received metric — it should start incrementing. For message-level inspection, use the Azure IoT Explorer desktop tool or the built-in Monitor Built-in Endpoint in the portal.
Each message from DataTalk arrives as a JSON payload containing the current tag values and a timestamp. Confirm that the tag names and values match what you see in the DataTalk Tag Database → Read Values tab.
Routing data to Azure services
Once messages are arriving in IoT Hub, use Message Routing (IoT Hub → Message Routing) to forward them to:
- Azure Blob Storage — cold archive for long-term retention and export
- Azure Stream Analytics — real-time filtering, aggregation, and alerting
- Azure Event Hub — high-throughput ingestion for downstream consumers
- Power BI — real-time dashboards via Stream Analytics → Power BI output

Without any routing rules configured, all messages arrive at the built-in Event Hub-compatible endpoint (messages/events). You can consume this endpoint directly from your own application using the Azure Event Hub SDK.
Azure IoT Hub free tier is limited to 8,000 messages per day. At 1-second intervals with 10 tags per message, that is one message per second — 86,400 messages per day. Upgrade to a Standard tier or increase the sending interval if you exceed the free quota.